
Views: 0 Author: Site Editor Publish Time: 2026-10-20 Origin: Site


Contractors and facility managers constantly seek superior materials for demanding environments. They increasingly replace traditional steel and aluminum structures. This material shift happens because advanced composites offer exceptional corrosion resistance. They also provide an incredibly high strength-to-weight ratio. You can easily move these lightweight materials across busy job sites.
However, adopting new composites brings unique operational challenges. While lighter and easier to maneuver, these materials require specific handling procedures. You must apply precise cutting and joining techniques. This diligence ensures you maintain structural integrity. It also helps you comply with stringent safety standards. Improper installation can quickly compromise long-term performance.
We provide a transparent, evidence-based evaluation of the entire installation process. You will learn about necessary tooling and critical risk-mitigation strategies. We outline practical techniques to ensure complete project success. This guide helps you navigate everything from initial site readiness to final mechanical fastening.
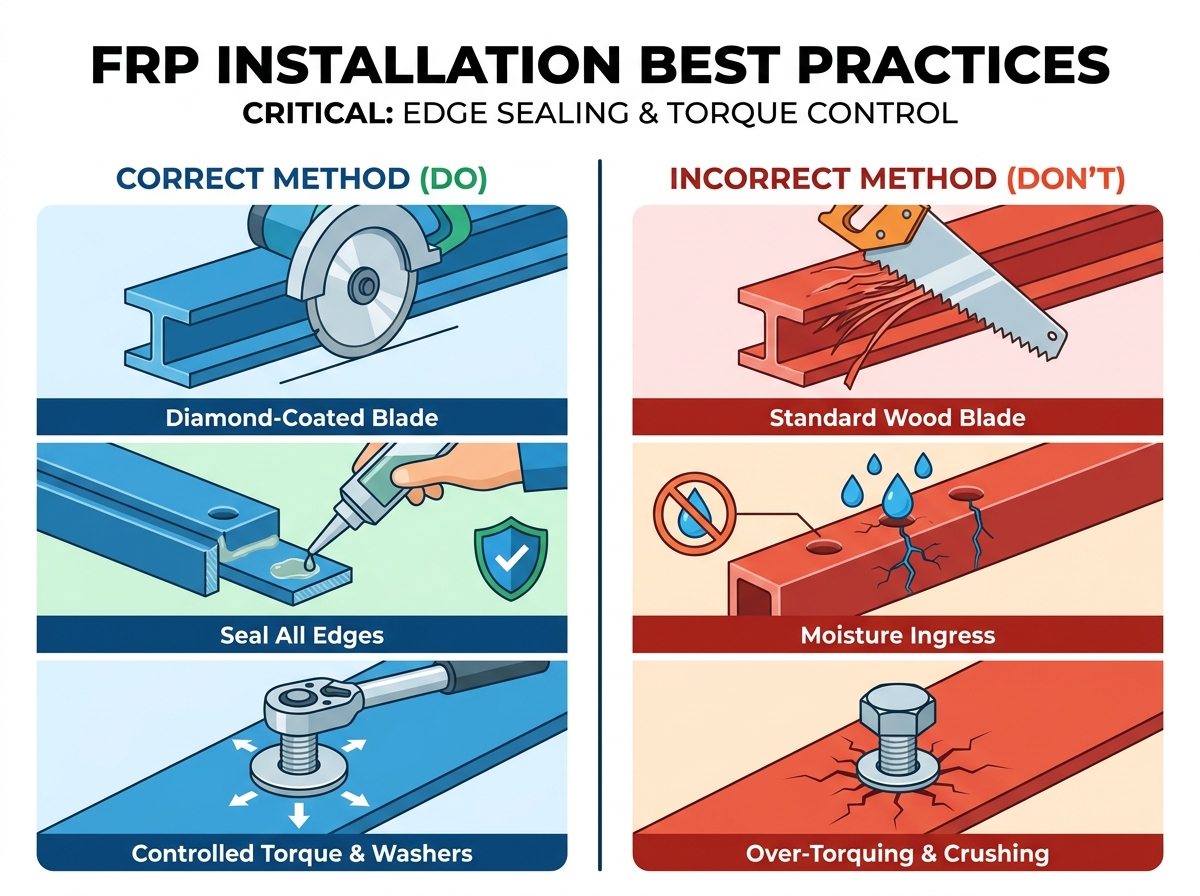
Tooling parity: Standard carpentry tools work for FRP, but diamond-coated or carbide-tipped blades are mandatory for clean, scalable cuts without delamination.
Critical maintenance step: All cut edges and drilled holes must be sealed with a compatible resin to prevent moisture ingress and environmental degradation.
Fastening constraints: Avoid over-torquing; FRP requires specific clearance holes, washers, and sometimes adhesive bonding to distribute load evenly.
Proper preparation dictates the success of any composite installation project. You must establish a clear plan before modifying any materials.
Determine material staging areas before deliveries arrive. You must calculate support spans and load-bearing requirements early. Long spans require adequate temporary supports during the assembly phase. Unsupported overhangs create unnecessary stress on the composite matrix. You should clear staging zones of debris. Uneven ground can induce stress fractures if workers drop heavy loads on the profiles. Always stage materials close to the final installation point. This minimizes manual carrying distances and reduces accidental damage.
You cannot use standard woodworking blades for composite materials. Standard toothed blades grab fiberglass strands and cause severe fraying. You must specify the correct tools for your procurement team. Proper blades cut through the glass matrix smoothly. They prevent microscopic cracks along the cut edges. You should always use stainless steel hardware. Using cheap fasteners compromises the inherent corrosion resistance of the entire structure.
Tooling Specifications for Composite Installation
Operation | Recommended Tool | Tools to Avoid |
|---|---|---|
Cutting | Carbide-grit or diamond-coated circular saw blades | Standard toothed wood blades, abrasive masonry wheels |
Drilling | High-speed steel (HSS) or carbide-tipped drill bits | Dull bits, standard wood augers |
Fastening | Type 316 Stainless steel fasteners, oversized washers | Galvanized steel, small-diameter washers |
Careful handling prevents microscopic damage prior to installation. You must support long profiles properly during transit. Use flatbed trailers for transport whenever possible. Avoid letting long sections hang over the edge of a forklift. This unsupported weight causes severe bending. Such bending leads to warping or internal micro-cracking. Store FRP Pultruded Profiles horizontally on flat surfaces. Use wooden dunnage spaced every few feet. This spacing provides uniform support. Keep materials covered if you store them outdoors for extended periods. While UV resistant, keeping them clean ensures better adhesive bonding later.
Composite installation requires strict adherence to environmental health guidelines. Processing these materials generates specific hazards. You must protect your workforce and the surrounding job site.
Cutting and drilling operations generate fine fiberglass dust. This dust poses immediate respiratory and dermal hazards. It can irritate the skin, eyes, and lungs. Large-scale cutting produces significant airborne particulate matter. You must recognize this hazard before authorizing any fabrication work. Wind can carry this dust across open sites. It may affect unprotected workers in adjacent zones.
Standard safety gear is insufficient for heavy composite fabrication. You must enforce strict Personal Protective Equipment (PPE) protocols.
Respirators: Workers must wear N95 or P100 particulate respirators.
Eyewear: Mandate tight-fitting safety goggles. Standard glasses allow side ingress of fine dust.
Clothing: Require long sleeves and long pants. Coveralls provide the best protection against fiberglass itch.
Gloves: Supply heavy-duty leather or nitrile-coated gloves. These protect hands from sharp cut edges and fiber splinters.
You must implement local exhaust ventilation for indoor fabrication. Attach shop vacuums directly to circular saws. This captures dust at the source. For outdoor environments, consider wet-cutting methods. A light water mist binds the dust instantly. It falls directly to the ground. This method ensures compliance with OSHA airborne particulate standards. It also keeps the immediate work area significantly cleaner.
Treat composite waste responsibly. You must follow proper disposal protocols for all offcuts. Sweep up fiberglass dust regularly. Do not use compressed air to clean workstations. Compressed air merely redistributes the hazardous dust. Use industrial vacuums featuring HEPA filters. Cured resin materials and solid profile offcuts generally qualify as non-hazardous solid waste. Always verify regional regulations before sending bulk scrap to local landfills.
Execution requires patience and precision. Follow these standardized procedures to guarantee structural integrity.
You must secure the profile firmly before cutting. Use heavy-duty clamps padded with rubber. Unsecured profiles will vibrate. This chatter damages the material matrix and produces jagged cuts. Maintain a steady, moderate cutting speed. Do not force the blade through the material. Let the diamond or carbide grit do the actual work. Excessive feed rates generate extreme friction. This friction can melt the binding resin and ruin the cut edge.
Sealing represents a non-negotiable step for long-term longevity. Cutting exposes raw glass fibers to the environment. Moisture can wick into these exposed fibers. Over time, this moisture causes internal degradation. It compromises the structural strength. You must seal every cut edge and drilled hole. Apply a compatible polyurethane or epoxy-based sealant. Brush the sealant generously over the exposed areas. Allow it to cure completely before installing the fasteners.
Precision drilling dictates connection quality. You must maintain standard tolerances for clearance holes. Typically, drill holes 1/16 inch larger than the fastener diameter. This oversized hole accommodates minor thermal expansion. It prevents the fastener from binding against the composite matrix. Always use a wooden backup block. Clamp this block tightly against the exit side of the hole. The drill bit will pass through the composite and into the wood. This technique completely eliminates breakout and splintering on the back surface.
You can choose between mechanical fasteners and structural adhesives. Many projects utilize a hybrid approach.
Mechanical Fastening: Always use oversized, heavy-duty washers. Standard washers concentrate pressure into a tiny area. Oversized washers distribute the clamp load across a wider surface. Observe strict torque limits. Over-tightening will crush the fiberglass matrix. Hand-tighten nuts first, then use a calibrated torque wrench.
Adhesive Bonding: Prepare the surface meticulously. Adhesives fail on smooth, dirty surfaces. Scuff the bonding area using medium-grit sandpaper. Wipe away the dust using an approved solvent like acetone. Select compatible structural adhesives designed for composite materials. Epoxies work well for rigid joints. Polyurethane adhesives provide slight flexibility for vibration-heavy environments.
Even experienced contractors make mistakes when switching to composites. You must understand how these materials react to physical stress. Avoiding these common pitfalls ensures a durable, safe structure.
Installers often treat composites like solid steel. They drive impact wrenches until the bolts stop turning. This action causes immediate localized crushing. You will hear a distinct cracking sound. Micro-cracking destroys the structural integrity around the joint. The connection will eventually fail under a heavy load. You must calibrate torque wrenches specifically for composite materials. Train your crew to recognize the appropriate tension. Snug connections perform much better than crushed ones.
Composites expand and contract differently than adjacent materials. You must calculate the coefficient of thermal expansion (CTE). Continuous outdoor spans face extreme temperature swings. A long walkway will expand significantly under direct summer sunlight. If you rigidly bolt the ends, the material will buckle. Provide expansion joints at regular intervals. Use slotted holes for mechanical fasteners. This allows the FRP Pultruded Profiles to glide laterally as temperatures fluctuate.
Fiberglass itself does not rust. However, it can facilitate galvanic corrosion in mixed-material structures. Carbon-reinforced profiles conduct electricity. If you bolt them directly to aluminum or steel, galvanic corrosion accelerates. The metal substructure will degrade rapidly over time. Always isolate incompatible metals. Use neoprene gaskets or specialized isolation washers. This breaks the electrical pathway. It protects your expensive metal substructures from premature failure.
Tooling choices directly impact structural lifespan. Using dull saw blades creates immense friction and pulling forces. The blade tears the glass fibers instead of slicing them. This action separates the internal material layers. We call this process delamination. Delamination reduces the load-bearing capacity by over fifty percent. A delaminated beam looks intact but poses a severe safety hazard. Inspect your blades daily. Replace them immediately if you notice fraying along the cut edges.
Switching materials changes your entire job site dynamic. You must evaluate how this shift impacts labor requirements and project timelines.
Steel fabrication requires specialized, highly paid labor. You need certified welders and fire-watch personnel. Steel installations mandate hot-work permits. You also require heavy cranes to lift steel beams into position. Composite materials completely alter this workflow. Standard carpentry labor can handle most composite installations. Two workers can manually lift a beam that would otherwise require a crane. You eliminate welding hazards completely. This creates a safer, quieter, and vastly simplified working environment.
Project speed increases dramatically with composite materials. You can execute rapid on-site fabrication. Workers simply measure, cut, and bolt the pieces together. Steel often requires off-site pre-fabrication. If a steel beam arrives the wrong size, you face massive delays. You can easily trim composites on the spot. Furthermore, these profiles boast immediate readiness. They require no post-installation painting. They need no galvanizing touch-ups. Once you tighten the bolts, the structure is entirely finished.
Facility managers must make informed design choices early.
Fastening Decisions: Choose mechanical fastening for structures requiring future disassembly. Select structural adhesives for permanent, vibration-resistant bonds.
Team Readiness: Audit your internal maintenance team. Can they adapt to new tooling requirements? If they resist strict torque limits or dust mitigation protocols, consider alternatives. You might outsource the initial build to specialized composite contractors.
Do not purchase bulk materials blindly. Validate the performance data first. Request localized load-testing data from your manufacturer. Ensure the numbers match your specific environmental conditions. Ask for physical material samples. Have your installation crew cut and drill these samples. This hands-on experience builds team confidence. It allows you to refine your tooling setup before the actual structural materials arrive.
Successful installation heavily relies on respecting the material's unique composite nature. You cannot treat these profiles exactly like timber or steel. You must procure the correct diamond-coated tooling. You must enforce strict dust mitigation protocols. You must distribute connection stress using oversized washers and precise torque limits.
Proper handling during transit and storage sets the foundation for success. Careful cutting and meticulous edge sealing guarantee environmental resistance. Strict adherence to these installation guidelines ensures your desired outcome. You will achieve decades of reliable, corrosion-resistant performance.
Ready to upgrade your infrastructure? Download our detailed engineering spec sheet today. Request a technical consultation to discuss your specific structural requirements. Get a custom material quote and discover how FRP Pultruded Profiles can transform your next demanding project.
A: Yes, you can paint them. First, clean the surface thoroughly. Scuff it lightly with fine sandpaper to promote adhesion. Wipe it down with a solvent. Apply a high-quality, two-part polyurethane paint. However, remember that premium composites typically feature molded-in colors and integrated UV inhibitors, eliminating the need for routine painting.
A: Standard engineering tolerances for cutting typically sit at ± 1/8 inch. This depends largely on the overall span and connection type. Precision CNC cutting can achieve tighter tolerances if required. Always factor in thermal expansion gaps when finalizing your exact cut measurements.
A: No. Unlike steel welding, composite installation is entirely cold work. You only use saws, drills, and wrenches. This eliminates fire risks and the need for dedicated fire-watch personnel. However, monitor the friction heat generated by dull saw blades to prevent material scorching.
A: Epoxy and polyurethane structural adhesives perform best. Epoxies provide rigid, high-strength bonds. Polyurethanes offer slight flexibility for dynamic loads. Regardless of the adhesive, you should always incorporate mechanical concrete anchors. The adhesive prevents water ingress, while anchors handle the primary shear loads.